Drawstring Backpack: Instructions
 I think that my reference to Martha Stewart projects as sources of “inspiration” was spot on. I’m glad I saw their “Easy Beach Bag” project, but it really only served as inspiration for the final project as the directions did not end with the type of finished bag I wanted. If you followed their directions you would end with a drawstring backpack, but their pattern for it did not meet my standards (which I honestly hadn’t realized were terribly high). So I had to work it out on my own, based loosely on theirs, and pulling some tricks out from when I made lunch bags for my kids a couple years ago using this pattern. The main difference in the end is that I wanted the seams hidden on the inside of the bag, so that the lining is inserted rather than sewn together, and I wanted the holes where the drawstring comes out to be finished. A little tricker, but worth the effort.


Here is my tutorial on how to make this more finished version of a drawstring backpack. I’m working on some step-by-step pictures to go with this tutorial that I will get up soon. Let me know if you use this tutorial and if I can improve it in any way!
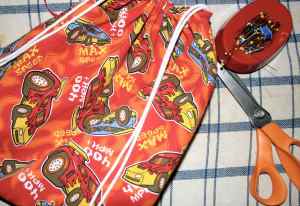
Materials Needed 1 14 x 32 inch piece of preshrunk cotton or other fabric (I used decorator weight fabric I had lying about)* 1 14x 32 inch piece of nylon or cotton (use nylon if you plan to put wet suits, waterbottle or other damp items in the backpack to prevent a soggy pack)* 2 4-inch lengths of cord 2 50-inch (+) lengths of cord
*You can customize the size of the back by changing the size of your rectangle, just be sure to remeber your bag will end up about 1/2 the size of your rectangle– so figure out your dimensions and double the length and add seam allowances. Also, don’t forget to change length of your cord if you lengthen the bag.
1. Fold each piece of fabric in half, width-wise. Iron to make a nice crease, then pin. For the interior fabric (the nylon lining) sew up the sides.

4 inch loop, as it should be set inside the folded exterior fabric
2. On the exterior fabric piece you will need to tuck in the loops before sewing. Fold one of the 4-inch cords in half; place inside one of the bottom corners, matching up the raw ends of the cord with the raw edge of the fabric, the loop tucked inside facing toward the center of the fabric. Pin in place as you see fit. I snuggled a pin very close to the loop so that the loop wouldn’t slide out of place.

loop inserted, pins holding it secure
Repeat on the opposite side. Sew up the sides sewing over the cording to lock the loop into place– I did a little back and forth over the loop to make sure it wouldn’t pull open the seam there. 3. After finishing your seams as you see fit (pinking

exterior & interior with finished seams. Mine have bottom seams because did not fold fabric but rather sewed two pieces together.
shears, zig-zag stitch, serging, etc) inside out the lining so that the seams are on the inside– Do not inside out the exterior fabric. Slip the lining inside the exterior so that right sides are facing. Pin the top raw edges to secure. You will be sewing around the top, but need to leave two gaps, one largish one (perhaps 2 inches) and one smaller one (perhaps 1 inch or 3/4 of an inch). These gaps should be evenly spaced from the side seams on one side of the bag– space them about 1/2 and inch from the side seams. 4. About 5/8 inch from the raw edge sew from one mark just behind one side seam around to the other mark on the other side of the opposite side seam. Now sew the interior from the end of one gap to the beginning of the next on the unsewn side.

The lining pulled through...
5. Through the larger gap pull the lining through, and inside out the exterior fabric. You should now have a long piece that looks like to right-sided bags sewn together. Tuck the lining inside and iron the joining seam to make the top edge crisp and defined, folding the fabric at the gaps in and ironing them to match the sewn parts. 6. Starting at the far edge of one gap topstich right near the top around to the beginning point of the other gap, crossing both side seams, sewing through both the lining and the exterior fabric. Start at the end point of the first gap and topstitch through the other gap until only 3/4 of an inch remains of the 2nd gap (it should match the first in location and size.

stitch completely around to create channel for cording
Now stitch completely around at the top about 3/4 of an inch from your top stitching. You should now have two evenly spaced and sized gaps at the top of the bag and a channel formed from the two series of stitching you have done. 7. Using the saftey pin method or one of those handy dandy threading tools, thread one 50 inch cord from one gap all the way around so that both ends come out. Working from the other gap and in the opposite direction thread the other cord through.
8. Pull one end of the cord down and through the small cord loop and back up tying the cord ends together. Repeat on the other side.

finished bag with strings tied

finished bag with lining

finished bag with strings pulled partially


 Changing My Mind
 Love in the Time of Choera
 Mediterranean Harvest
 The Professor and Other Writings

Thanks so much for the tutorial. I was thinking of buying a backpack for my son to use for carrying his sporting equipment, but its a much better idea to make it personalized with his chose of fabrics, colors etc.
Somehow I missed your comment earlier, but I’m glad you liked the tutorial! Let me know if there is anything that could be clarified.
this is just what i was looking for… i have 2 (5 and 6 years old) with autism and i need some kind of purse-type bag that keeps my hands free and i saw someone at the grocery store with a fancy leather version, but love fabric (washable is a must with boys) and have been looking for a pattern with lining… thanks so much, can’t wait to try it!
I’m making a mock-up of this backpack prior to having my 4-H sewists make their own at next month’s workshop. Another way to have a finished area for the drawstrings to pass through, would be to leave a half-inch gap one inch from the top of the exterior fabric while stitching its seams. Then, half-inch from the top, stitch again to the end of that fabric (so you have a half-inch ‘hole’ in your seams). Zig-zag or pink those seam allowances, and then use a straight stitch JUST along that opening, to stich its raw edges down on each side (press the seam allowances first so they are laying perfectly flat). Then, your top opening between the lining and the exterior fabric, that you use to slip the lining through will only need one hole, not two.
Top-stich, sew the lower stitching which creates the channel for your cording to pass between the topstitching and lower stitching – and then pass the cording into the channel via the openings which you had sewed in. Make sure your top-stitching connects into the straight-stitching you’d used along those channel openings and there will be a very finished-looking drawstring backpack!
Also a reminder that pressing the seam allowances on the lining and the exterior will make the bag lay more nicely when it is completed.
THANK YOU for this wonderful tutorial! It is definitely an improvement on the Martha Stewart one, and I look forward to using it with my sewists!
Sorry, 3/4 inch opening, not half inch, unless your cord is quite narrow. So the gap should start about 1 1/4 inch from the top, not 1 inch. You could make it 1 1/2 inches, if you want to be extra certain the cord can pass through your opening …. Our bag turned out beautifully, it’s going to be a lot of fun to do this with the 4-H kids.