A recipe YOU won’t mess up: Apricot Clafouti

A few years ago (and I won’t even try to guess how many it was–I keep thinking things happened a year or two ago, bu then when I really figure it out it is more like 5 or 8!), I came across what looked like a simple but elegant dessert in a Martha Stewart magazine: Cherry Clafouti. I had no idea what it was. I didn’t even know how to pronounce it. But I had cherries, and it looked too easy not to try.
Interestingly, it wasn’t at all what I thought it was going to be but I liked it. Oddly, I never made it again. Then paging through the dessert section (you know, my favorite section) of my newly re-discovered favorite cookbook, Meditteranean Harvest, I saw Apricot Clafouti. There it was again: that word I couldn’t pronounce. And it was apricot season. In fact, I had just bought some local Blenheims on sale at our local grocery that week. I’d been trying to dial back my baking a bit as our sugar consumption was spiraling out of control, but I thought this recipe warranted the re-opening of the sugar container. I could call it a breakfast treat (Shulman even says to serve it for breakfast in her “leftovers” note, so I felt supported in this).
This is the easiest recipe. Really. Okay. Somehow I managed to mess up twice (twice!) in making it, but I know you wouldn’t do that. No one would. Because it is so easy! This is the kind of recipe you can commit to memory and whip up with little to no utensils. Some fruit (soaked in amaretto, but probably could go in unadulterated) placed in a dish. Eggs, milk, sugar, and flour (and a bit of vanilla) mixed up and poured over the fruit. Bake. Eat. See, nothing to it. Unless you’re me. Then, somehow, you forget to add the sugar to the apricots while they’re macerating (even though you know that and do it all the time for strawberry shortcake). Then, even though it is out on the counter, you forget to mix in the milk. And you don’t remember until it is in the oven, and you turn around and see it still on the counter. How odd, you think, I don’t remember any milk in this recipe. Quick look to the recipe. Even quicker grab into the oven to pull out the dish. Messy sloshing of batter back into bowl to add milk (apricots all gooed). Back into the oven.
But even with all my mishaps, this still turned out well. It looks odd, there is no doubt. My son, Mr. Sweet Tooth himself who wanders in to the kitchen every time he smells anything hoping it is dessert, thought the apricots were egg yolks and almost declined a piece. Looking at the picture, I have to remind myself they are not. But looks aside, it is delicious. It actually reminds me a bit of dutch babies (no surprise, almost identical ingredients and cooking method), and I think it would actually be very nice as a sweet breakfast.
In case you want to try it (sans odd mishaps I know won’t happen to you), here’s the recipe. And if anyone knows how to pronounce it can you PLEASE let me know. I don’t want to go around saying it incorrectly like I always do with nicoise (even though people keep correcting me).
Apricot Clafouti
adapted from Mediterranean Harvest
1 lb apricots, halved and pitted
2 Tbsp Amaretto
7 Tbsp granulated sugar
3 large eggs
1/2 tsp vanilla extract
Salt
2/3 cup sifted unbleached all-purpose flour
3/4 cup low-fat milk or buttermilk (I used milk)
1 Tbsp powdered sugar (optional)
1. Toss apricots in Amaretto and 2 Tbspns of sugar. Let sit for 30 minutes. Drain liquid and reserve.
2. Preheat oven to 375. Butter ceramic tart pan or clafouti dish (there is such a thing?). Arrange drained apricots in dish, rounded side up.
3. Beat eggs with remaining sugar and vanilla extract until sugar is dissolved. Add a pinch of salt and the liquid fromt eh apricots and compbine well. Slowly beat in flour and which until smooth. Add themilk and combine well. Pour over the apricots.
4. Bake 30 to 40 minutes, until the top is browned and the clafouti is firm and puffed (it seems like mine cooked quicker, maybe 20-25 minutes, but that could have been because of my multiple mishaps). Press gently on the top to see if it is firm; if not, return to the oven for 5 minutes. cool, then serve warm or at room temp sprinkled with powdered sugar.
Tall, tall trees: kids & conservation
 [Humbolt Redwoods State Park– Avenue of the Giants]
When I was teaching in June, I had an acquaintance from the Academy of Science come and speak to my class about the intersection of technology and science in his work. It was interesting for many reasons, but especially because of a short video he showed us to illustrate how virtual imaging augments scientific studies: this video showed the shrinking redwood habitat due to global warming in the next 50 years or so. Now this video (which was shown, I believe, at the climate conference this past year) was a reminder for me of how fragile our world is , and also of how changes are happening even when they don’t seem to be. (I’m not sure where to access that video yet, but here is a link to the Academy website on this issue.)
I grew up in the redwoods. My house and yard as a young child were almost entirely shaded by them, and later, after we moved to a sunny hillside where my mom could finally have her veggie garden, we spent many hours at the local state park filled with redwoods. My kids, so far, have been raised in suburbia. They’ve met a redwood or two, but this video reminded me how important it is to get them out into the forest a bit more. It particularly reminded me of that very special quiet that you can only find in a redwood forest, a quiet that is a combination of footsteps softened by the forest floor and reverence for the magnificence of these giant trees.
This summer we’ve made an effort to visit some of these forests that surround us (still, for now) in our region. We’ve made it out to my old stomping ground, Armstrong Woods State Reserve, for a birthday picnic for my sister, and my kids discovered a hollowed tree trunk that they bravely entered even though it was very, very dark (one that my sister and I had also braved many times as children). We also made our first visit to Muir Woods National Monument (not sure how I’ve lived in this region my whole life and never visited, but I guess there is always more to discover within a stone’s throw of your home), and my kids enjoyed reading the informational panels and taking their own pictures of the park. Most recently, we packed ourselves up and headed north for some camping near Fortuna, and on our way home meandered through Humboldt Redwoods State Park, driving for a bit on the Avenue of the Giants. I discovered, much to my surprise when we stopped mainly to use their restrooms, that they have one of the most wonderful visitor’s centers for kids, with lots of things to touch, smell, and interact with.
Besides getting out and experiencing the redwoods, I’m just starting to see what else I can do. So far, I’ve followed the links provided by the Academy, including Save the Redwoods League. And I’m posting this. As a reminder to myself that this is something that deserves my attention. And the attention of my children. But first, they must learn to love the redwoods like I do, and that means we will have to make some more trips to the forests (I’m thinking Henry Cowell Redwoods might be up next). But then what?
Any ideas? What are the habitats threatened in your areas? How do you get your kids involved in conservation?
World Cup Party: Catalan Ratatouille

This post is an excerpted version of my review of Martha Rose Shulman’s Mediterranean Harvest that I posted on 101 Cookbooks Library. However, as far as I know, that site is still in testing and not accessible by all (although Heidi’s main blog 101coobooks.com is well worth checking out), so I figured I would re-post it here as well. When that site is open, I’ll pass the word on–it is great way to find out about great (or overrated) cookbooks.
There are some drawbacks to having an embarrassingly large cookbook collection: you need ample storage; you are embarrassed to tell new acquaintances exactly how many you have so you begin talking very vaguely when it comes to numbers; you sometimes can’t remember which book that recipe is in when you need it; and you forget about perfectly wonderful cookbooks you bought but never really used.
On the other hand there are moments when it is absolutely delightful to have an embarrassingly large cookbook collection: when it is the World Cup final game and you have decided two days before to make tapas and need to find some good recipes, now!; when you are looking up at your collection you notice a Mediterranean cookbook you haven’t touched since buying it (who knows why) that happens to provide almost all the recipes you need for your successful World Cup lunch with friends.
Cookbook? Mediterranean Harvest by Martha Rose Shulman.
Our menu included from this cookbook alone: Sangria; Catalan Ratatouille; Giant Favas with Mint (I had a spot of trouble with this one, but not to be written off entirely because of my poor dried-bean skills); Mushrooms in Garlic Sauce; Spicy Potatos with Aioli. We also made grilled herb shrimp (from Barefoot Contessa Parties!), cooked up some local sausage, and put out some olives and spiced almonds.
Of all those, one of my favorites was the Catalan Ratatouille, which we served on toasted bread slices drizzled with olive oil and rubbed with garlic. Even though the World Cup is long finished, there are still plenty of reasons to make some tapas to share with friends, so I thought I’d share the recipe.
Catalan Ratatouille
adapted from Mediterranean Harvest (p72)
3/4 lb (1 med) eggplant, peeled and diced very small (I found a regular vegetable peeler worked very well for peeling the eggplant)
Salt
1/4 cup extra virgin olive oil
1/4 cup water
2 red bell peppers, peeled*, seeded, and thinly sliced or diced
1 green bell pepper, peeled*, seeded, and thinly sliced or diced
3 medium onions, very finely chopped
1 medium zucchini, peeled* and very finely chopped
4 large garlic cloves, minced
Freshly ground black pepper
1 can (14 oz) tomatoes, drained (i think I used whole romas)
*if you see an astrix next to the words peeled, that means I didn’t. It cooks for so long the peels break down so much you don’t notice them at all.
1. Lay eggplant pieces on some paper towels and sprinkle with salt. Drain for 30 minutes, then pat dry with paper towels.
2. Place the eggplant, olive oil, water, bell pepper, onions, zucchini, and garlic in an enameled cast-iron Dutch oven or an earthenware casserole set over a flame-tamer (or in my case, my un-enameled cast-iron Dutch oven on my stove top). Add 1 tsp salt and pepper to taste, reduce to low, cover, and cook until soft, about 1 hour, stirring gently and occasionally. Add the tomatoes, cover again, and cook until mixture has reduced to a thick relish, 2 to 3 hours (or 4), stirring occasionally. If you need more liquid, add some water, if you need less, turn up the head at the end to boil off some of the liquid. Cool before serving.
crafthope: my second go!

[homemade cases bring a bit of home with us on our car trips]
I’m all signed up to tackle the latest craft hope project (project 9). My friend and I completed scarfs in February for their project 6. I missed a few projects in between, but this one looks like a good fit for me (and hopefully a few friends). This project involves making homemade pillowcases for terminally ill children, coordinated to coincide with Childhood Cancer Awareness month in September.

My own children have been the lucky recipients of homemade pillow cases (thanks to one of my crafty aunties who loves to sew), and I know how much cheeriness and love they can bring. When we travel (as we are right now!), these are the cases their pillows go in. She even made them Halloween-themed ones that double as candy-collecting sacks! Lucky kids, eh?
Although I’ve made curtains galore, a few duvet covers (including one for a king bed that turned me off of them forever–so much fabric to deal with!), and some pillow shams and simple covers for couch pillows, I have yet to make a simple pillow case. My aunt makes her with three coordinating fabrics and lovely french seams, and these are the ones I’m hoping to tackle (and hopefully use this bookmark from Bari J. I saved ages ago to accomplish it!).
But I’m also planning on using this project to give my daughter a chance to practice sewing, and for that I may just use the simpler version provided by ConKerr Cancer. I’m already setting up a date to get my friends and their daughters and our sewing machines together. This seems like the perfect project to get us all crafting together.
Skipping stones

My daughter is at a threshold.
On the one hand, she is burgeoning. She is about to become a young woman, and daily we are reminded of this. She requested undergarments. Is interested in borrowing my face wash. Trades whispered secrets with her best friend in the backseat of my van. Cares what color her shoe laces are (bright neon pink, please).
And yet.
She is still a little girl. Who doesn’t need to wear *certain* undergarments or wash her face daily. And although those days will be here soon enough, they aren’t quite yet.
Right now, this summer–which seems to be a very delicate thing in the scope of her childhood–she is still young enough for some very simple things. Like a refresher lesson on skipping rocks. Which we did camping last weekend.
We found ourselves at a curve in a lazy river. The pooling water before us barely moving, and the bank was a sea of smooth round rocks. Searching, we found the flat discs that skim the best, and both my husband and I set about reminding our children how to skip rocks. And her thrill–my thrill–when she finally (after quite a few plunks) got a slim, smooth rock to dance across the water. One, two, three. It skittered like magic across the surface before diving below to settle in at the bottom.
“Did you see?!” she yelled excitedly. Yes, I did. I saw her, teetering on the edge of childhood.
It has been a while, hasn’t it….

[a beach find from a much needed day at the beach yesterday with momma-friends and all our kids]
I recently read a book that was a quiet study of life (Exiles in the Garden). At the end of this book, in which nothing spectacular happened and half the main characters die not very spectacularly, I was reminded of the ebb and flow of our days. I was able for many months to semi-regularly update this blog. But then it seemed I just wasn’t. Four months since my last post and nothing terribly different in my schedule. A little re-prioritizing as I try to shift gears post M.A., but nothing earth-shattering. None-the-less, it has been a while, hasn’t it?
Yet, I have been missing this little moment of my own. This small bit of writing I get to do, the large amount of sharing. And I’ve been collecting pictures, recipes, and thinking about posts–which means I have a lot of sharing to catch up on! I wanted to start right in with some recipes I tried out, but each time I sat down in the last couple weeks to type, one of my children was at my elbow needing Momma for this or that. And in the evenings, after years of late-night homework or volunteer work, it has been so nice to just veg out a bit with my husband. So instead of putting together the post I wanted to, I’ve got this. A tentative toe-in-the-water. A quiet hello.
In the morning we are off to the beach. Four days away from our home. From our everyday chores. Four days to read, read, and read. (Little Bird of Heaven, The Professor and Other Writings, and Every Last One are in my bag along with a couple mags) And I will watch the kids play in the sand and the waves (small baby ones where we’re going), snapping some pics as I can. But… I am hoping that I will also take a little time for this blog and post a couple things I have waiting in the wings.
What have you been reading, doing, sewing, writing?
Musty Cupboards No More (and other exciting adventures)

Old magazines.
A few years ago I did a big purge. I finally admitted to myself that I did not need to keep 10 years worth of magazines. In fact, I didn’t even need to keep one year’s. Now, my practice is to donate them as soon as I’ve finished them. If there is a recipe I want to try, I try it. If I don’t get to it in a month or so, chances are I won’t get to it at all.
But this is a relatively new practice for me. For years I saved (and saved and saved) magazines. I was convinced I was going to try all those recipes and that by moving that magazine on, I was losing irreplacable resources. Then I realized two things. One: all this “irreplaceable” content is being archived on the internet and oh, so easy to access (epicurious.com and cookinglight.com and all the rest). I also realized that ideas are rehashed, redone, and re-invented, so if I don’t get to it in 1999, it will probably come around again in 2002 (and then again in 2003, 2005, and so on).
I was reminded of all this as I was pulling out some linens to loan to a friend (who threw her FIRST(!!) tea party). Behind these infrequently used napkins and tablecloths I found a stockpile of forgotten (and musty and mildewy) magazines. I pulled them out and moved them onto the recycle bin (too old and smelly to donate), but not before I took a quick look to see what I thought worth saving a few years back.
Nothing much to remark on, but I did find one lone magazine that dated to my high school days: Victoria circa 1992 (oh, how I loved Victoria when I was in high school and how I imagined myself into all those romantic fashions and landscapes!). 
I’d forgotten those Jessica McClintock ads (large lacy collared dresses),
 and was almost lured into saving this issue for a cute little article on a minature children’s tea (button tarts, for goodness sakes!)….

…but my common sense won out.
Into the bin it went!

Now, I’ve got some more cupboard space (although a bit musty and airing out as we speak), and feel accomplished although I haven’t done anything much at all. Most of all, I feel thankful for the internet and especially Google; finding old (and new) ideas, is only a search away.
Keeping busy.
 I haven’t been baking much this week. I haven’t been sewing. Or knitting. But somehow I’ve been keeping busy. Thought I’d share a couple things that have been occupying my time in the last week or so (with totally unrelated pictures).
(Finally) Picked up a copy of The San Francisco Panorama. I heard about this the day it was released, but was never in the right place at the right time to grab a copy. We were killing some time between basketball games (my 9 year old’s first tournament) in the oh-so-picturesque town of Pt. Reyes Station and wandered into the local bookstore. A small stack of them by the cash register beckoned me closer and I decided this publication demanded a splurge from me. I’m glad I did. I can’t stop reading it!
Well…not entirely true (I mean I am typing this up instead of reading it), but almost. I was able to hold off beginning to read it until I finished some gardening today, best of which was getting some new seeds in the ground I picked up a couple weeks ago in Petaluma at Baker Creek Heirloom Seeds. We just had time for a quick stop at their fairly new location after a lunch visit with my mom and step-dad, but long enough to choose a few things for the veggie garden. Truth be told, I could have spend hours in there, reading about all the seeds, dreaming up a massive garden. But I only have a couple small boxes to plant, so its probably a good thing I only had a few moments.
We grabbed some snap peas, lettuce, peas, and Italian radiccio for planting next fall. I’ve been meaning to get some seeds as my husband’s noni alway’s grew her own and it’s been a few years since we’ve had her traditional salad at our family gatherings (she moved into assisted living a few years ago). I’ll need to put a note on my calendar to remind myself I bought these, as I’m sure to forget once its actually time to plant them.
 I also watched an interesting documentary the other night, 49 up. I’d never heard of these before, but it is the latest installment in a series of documentaries on the same group of people since they were 7 (original was titled 7up). The filmmakers chose a cross-section of English society and revisit them every 7 years. My husband thought it would be “prosaic,” and seemed uninterested, but in the end, he was just as glued to the screen as I was and we kept delaying turning it off to go to bed. I guess “prosaic” can be a good thing.
Biscotti di Regina
 *Regina really means queen in Italian, so sometimes these are also called Queen’s Biscuits
My husband’s mother (my kids’ Noni) ate these as a child. Her first generation Sicilian mother used to make them, but a few years ago when I was putting together a family cookbook, she could only find a partial recipe. We searched around and found another recipe (in the Soprano’s Cookbook), which we think is pretty close to the original. These cookies are a traditional Sicilian treat, often eaten with coffee.
My daughter recently had a chance to share a little bit about her heritage at school (as part of the penpal project) and we decided to make these. I was a little surprised, but all the kids seemed to like them–even covered in sesame seeds. Maybe I think kids are pickier then they are! Just in case you’d like to try them, I’ve included a recipe below. I made them in more of a crescent shape, but I guess long finger looking ones are more traditional.
Biscotti di Regina
½ cup milk
2 cups unhulled sesame seeds
3 cups all-purpose flour
1 cup sugar
3 tsp. baking powder
½ tsp. salt
1 stick unsalted butter, room temperature.
3 large eggs, room temperature
1 tsp. vanilla extract (or vanilla or orange extract)
Preheat oven to 375◦ F. Butter and flour 2 large baking sheets or use parchment paper.
Pour the milk into a shallow bowl. Spread the sesame seeds on a piece of wax paper or in another shallow bowl. Set both bowls aside.
In a large bowl of an electric mixer on low speed, beat the butter and sugar together. Add each egg, 1 at a time, and mix in between briefly. Add vanilla and mix. Add dry ingredients (you may sift together before adding, if desired). Stir until well blended.
Pinch off a piece of dough the size of a golf ball and shape into a log 2 ½ inches long and ¾ inch thick. Dip the log in the milk, then roll it in the sesame seeds. Place on a prepared baking sheet. Continue with the remaining dough, placing the cookies 1 inch apart.
Bake 15-25 minutes, or until well browned. Let cool on the baking sheets for ten minutes, and then transfer the cookies to a rack to cool completely. Store in an airtight container.
In the mail.

We finished the scarves for CraftHope! It feels so good to complete a project so quickly and with such purpose. The last 24 hours before shipping them off found me with a third still to go, but I worked dilligently at it and finished it off with no issues. I loved the pattern I knit, although I realized after I was half way done that they really wanted unisex scarves and mine was really more feminine. But it was too late by then, so I just kept at it.

I did have to pull out a few rows when I would lose my place during the smock pattern area, but this also usually happened when I was chatting away. Therefore, I am blaming my knitting skills rather than the difficulty of the pattern–it really was not as hard as I thought it would once I worked through it a couple times.
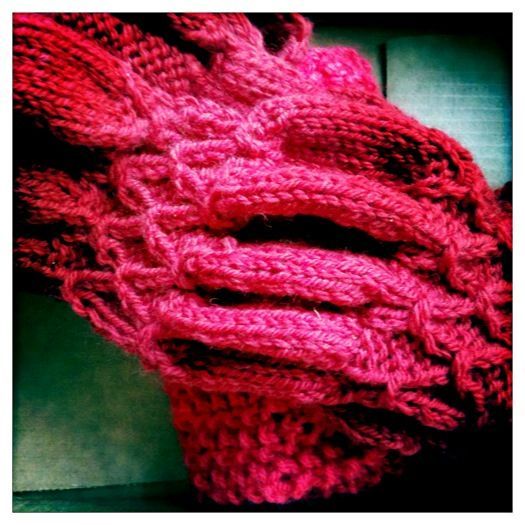
What I did realize is that for social knitting I need to work on easy projects–nothing that requires counting stitches (impossible to carry on a conversation as you are trying to whisper to yourself, “39, 40, 41”), and probably not patterns that vary too much row to row. So basically, that leaves the stockinette stitch. Either that or we institute our plan B. Silent knitting hours, and then separate Chatting hours. But then, that would never really work out–we just can’t help ourselves from chatting away.
 Changing My Mind
 Love in the Time of Choera
 Mediterranean Harvest
 The Professor and Other Writings